<Part 1> Make spinning 3D shapes in SDL2 and OpenGL
Setting up and creating a window
In this miniseries, you will be creating a program in C++ that will be able to render 3D shapes in SDL2 and OpenGL, and more importantly, learn about what is happening in depth while you write your program.
As a game developer, using SDL2 and OpenGL in a world of advanced game engines such as Unity and Unreal Engine may seem like a waste of time. And you’d probably be right. While programming at a low level may have benefits such as program speed, reliability, and smaller sizes, many games you’d be able to produce with a low-level framework (in a timely manner) can be made in a game engine much faster, and it’d run fine on low-spec machines, and great on average machines.
So, why bother?
By learning the components of rendering in a low-level setting, you gain a deeper understanding of how a game engine works under the hood, which in turn will teach you how to optimize your game better, making you a better game developer. And more importantly, because it is cool. That’s why I do it at least. There are many other technical reasons that could be argued, but we needn’t dwell, and just begin.
Let’s get started!
DISCLAIMER: This walkthrough assumes a working knowledge of C++ and how to compile it.
GitHub Repo: https://github.com/HadiCya/spinning_shapes
YouTube version:
What you’ll need
First things first, let’s get set up. The tools we’ll need for this are (continue reading for more detailed instructions):
OpenGL (OpenGL is most likely installed by default on your machine, but you must ensure the latest version is installed)
A C++ compiler (I use clang++ and compile C++20)
Before we get started, create a directory to store this project in, I named mine spinning_shapes
SDL2 is a development library built in C, that provides low-level interfaces to computer graphics hardware (with graphics libraries such as OpenGL), audio, video, peripherals, etc. We will be using it to actually display a window capable of rendering visuals.
Download SDL2 from the released tab on the SDL2 website. Follow this installation guide for more specifics about your operating system.
Whenever you want to access OpenGL, you’ll need some kind of loading library. Many of them have minor differences and accomplish exceedingly similar things. We will be using GLAD, a multi-language loader-generator for OpenGL. The GLAD web tool we will be using will be able to generate a header file for us.
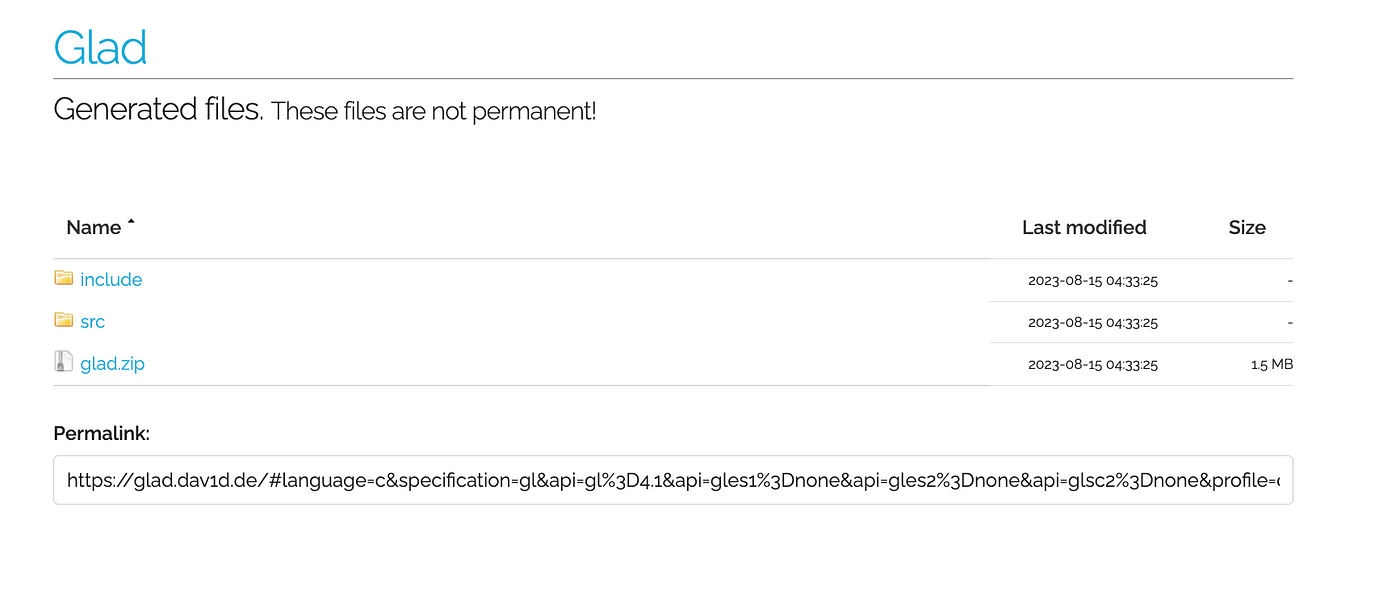
Go to the official GLAD loader-generator website, here you will select C/C++ under Language and OpenGL under Specification.
Under the API tab, we’re going to be selecting gl Version 4.1, and none for the rest. For Profile, we will be using Core instead of Compatibility. The Extensions column on the left is going to be populated, and we’re going to go ahead and click ADD ALL, and click the GENERATE button on the bottom.
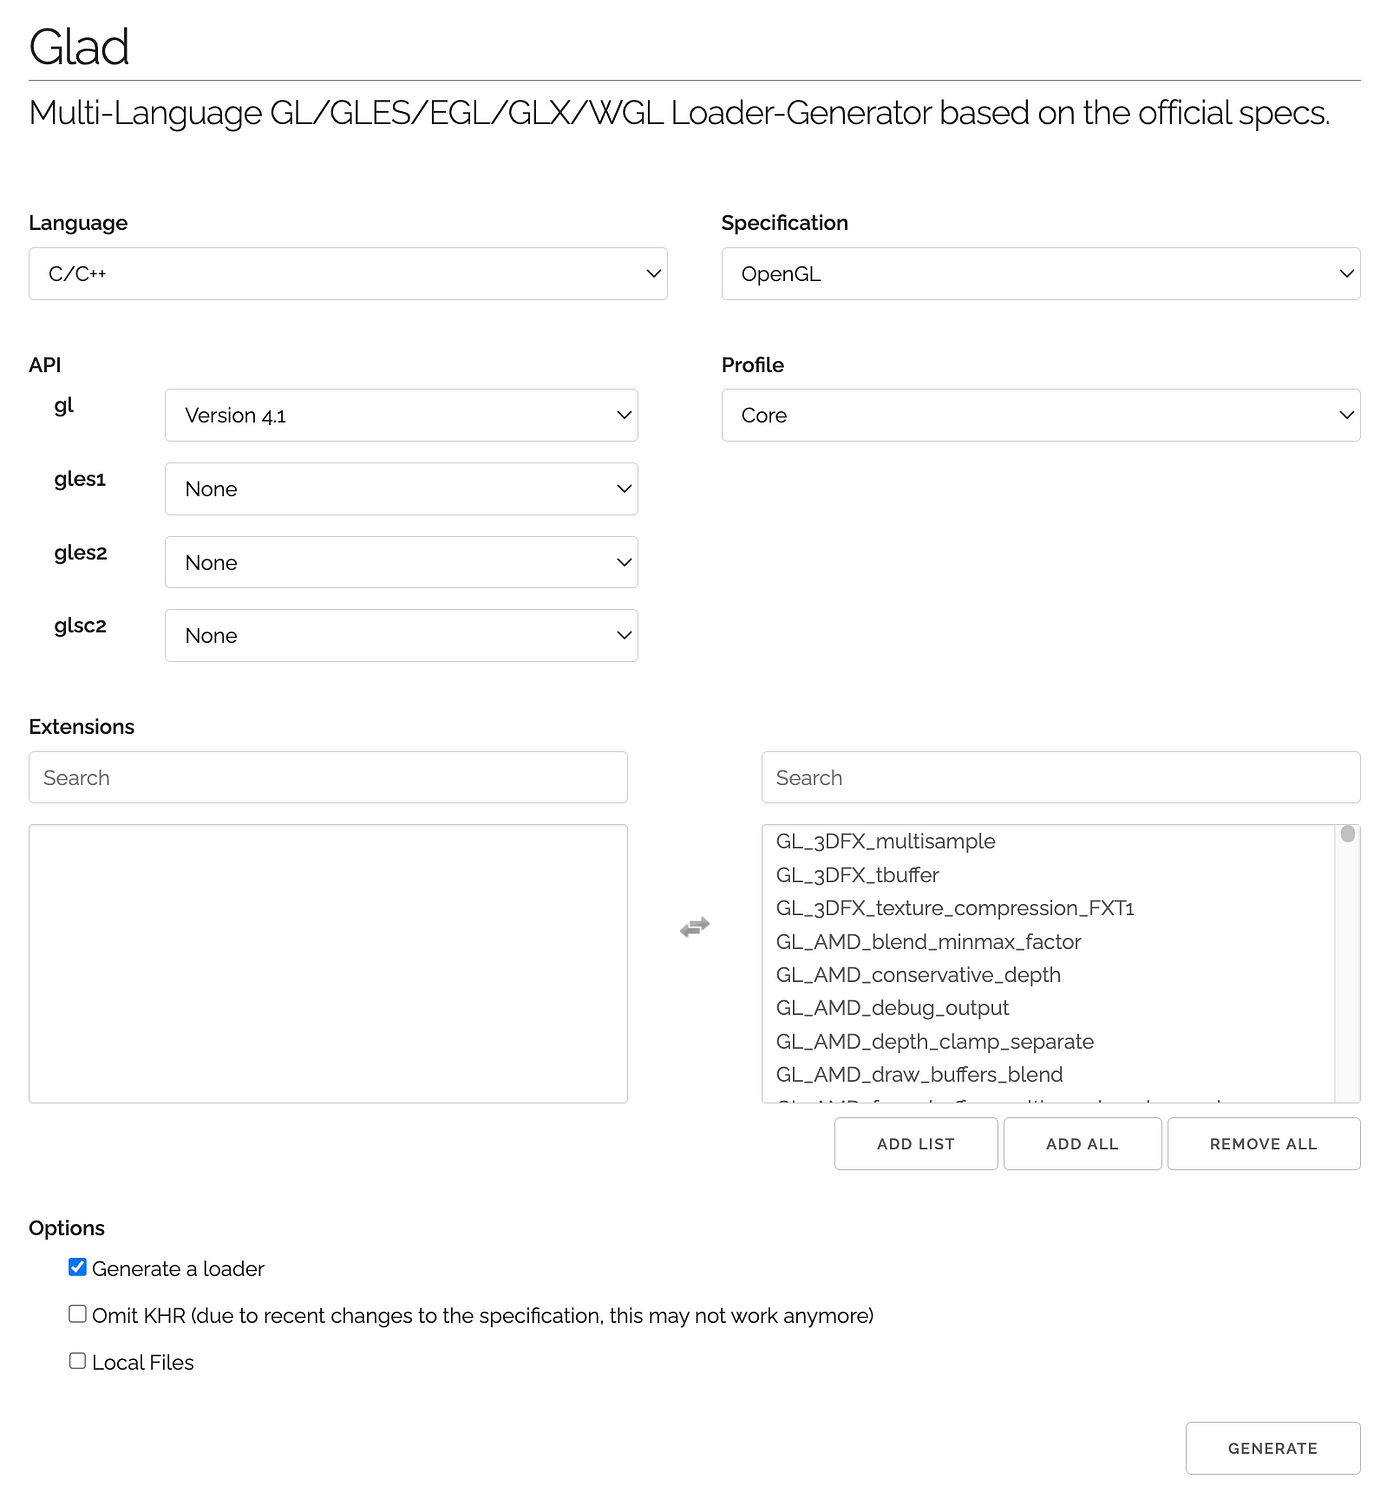
After you generate your GLAD zip, download it, and extract the glad folder into your project folder.
We’re going to need to be capable of making vector and matrix calculations that we wouldn’t otherwise be able to in OpenGL. This is where GLM comes in, a mathematics library for OpenGL and the OpenGL Shading Language (GLSL). Go ahead and download the latest release from the GLM Github. Extract it and put it in the project directory.
That’s all the downloads/installations we’ll need!
As I’m sure you’ve already discovered, installing and configuring these C++ libraries can prove to be difficult from machine to machine, and you’re going to probably have to do your own research to get things working especially if you’re a beginner. It’s all part of the learning. You can see what exactly works for me on my YouTube video.
Let's make a window
Let’s begin by creating a file called main.cpp , this will be what will run our main C++ code
#include <iostream>
#include <glad/glad.h>
#include <SDL.h>

int main(int argc, char* argv[]){
    SDL_Window* window = nullptr;

    int screen_width = 1000;
    int screen_height = 800;

    if (SDL_Init(SDL_INIT_VIDEO) < 0) {
        std::cout << "SDL failed initialization. " << SDL_GetError();
        return -1;
    } else {
        std::cout << "SDL successfully initialized.";
    }
We’ll need to start the program off by including <iostream> along with <glad/glad.h> and <SDL.h>
In our main() function, we want to initialize a SDL_Window which we will point to an empty pointer. We will be assigning this later, once we’ve set up some OpenGL attributes.
We will define our screen height and width, and then check to see if SDL successfully initializes, returning an error if it doesn’t.
    SDL_GL_SetAttribute(SDL_GL_CONTEXT_MAJOR_VERSION, 4);
    SDL_GL_SetAttribute(SDL_GL_CONTEXT_MINOR_VERSION, 1);
    SDL_GL_SetAttribute(SDL_GL_CONTEXT_PROFILE_MASK, SDL_GL_CONTEXT_PROFILE_CORE);
    SDL_GL_SetAttribute(SDL_GL_DOUBLEBUFFER, 1);
    SDL_GL_SetAttribute(SDL_GL_DEPTH_SIZE, 24);

    window = SDL_CreateWindow("C++ SDL2 Window | OpenGL",
            0,
            0,
            screen_width,
            screen_height,
            SDL_WINDOW_SHOWN | SDL_WINDOW_OPENGL);
    SDL_GLContext context;
    context = SDL_GL_CreateContext(window);

    gladLoadGLLoader(SDL_GL_GetProcAddress);
This is a lot of SDL and OpenGL! It is daunting at first glance, but we will be breaking it down to see what exactly is happening, in a digestible way.
SDL_GL_SetAttribute() is a function in SDL2 for setting window attributes in OpenGL before the window is created. Let’s go through this line by line:
SDL_GL_CONTEXT_MAJOR_VERSIONBy setting this attribute to 4, we are telling SDL we intend to use version 4.x.SDL_GL_CONTEXT_MINOR_VERSIONThis is completed when you set the minor version, and SDL now knows we intend to use version 4.1, when we set this attribute to 1.SDL_GL_CONTEXT_PROFILE_MASKis a way to define OpenGL context, which just means which features we want available. When setting up GLAD earlier, we chose Core over Compatibility. Compatibility supports a Legacy and an entirely different format of rendering objects on the screen, which isn’t necessary for us. That’s why it’s important to specify what is available to SDL and set our mask toSDL_GL_CONTEXT_PROFILE_CORESDL_GL_DOUBLEBUFFERDouble buffer is a rendering technique which stores two separate buffers, hence the name. While one frame is being displayed on the screen, a secondary buffer is generated in the background, so that the render can “swap” to the other one quickly. This is used to reduce flickering and smoother rendering.SDL_GL_DEPTH_SIZEDepth size stores an integer value representing bits that should be allocated for the depth buffer (or z-buffer). These values are responsible for deciding whether or not a pixel should be rendered, based on its depth to previously rendered pixels. In essence, the depth buffer makes objects clearly behind each other, or far away objects not being rendered directly in front of the camera.24balances well between precision and memory usage, and is the most common value.
Now that we’ve set the attributes for our window, we can create the window!
SDL_CreateWindow() takes 6 different parameters, a title, the x and y positions of the top left pixel (relative to the computer screen), the window width and height, and FLAGS
We use two flags: SDL_WINDOW_SHOWN and SDL_WINDOW_OPENGL the former indicating that the window should be shown immediately, the latter preparing your window for use with OpenGL. For more info, see SDL2 Window_Flags values.
Now, you can create an OpenGL context, which is an environment responsible for the state and resources. This manages OpenGL’s rendering operations and interactions with the graphics system. In this context, we will be managing the OpenGL state, frame buffer, functions, shaders, textures, buffers, and viewport.
Last thing in this block of setting up the window, we’ll need to call gladLoadGLLoader() which will just initialize the GLAD library to load up function pointers with SDL_GL_Get_Proc_Address
That wasn’t so bad, right? There are a lot of abstractions in OpenGL, and it’s just a matter of taking the time to slowly learn them and try new things. This block of code is crucial to preparing our window for OpenGL rendering. Now, let’s finish this window creation by making our main loop!
    bool done = false;

    while(!done) {
        glViewport(0, 0, screen_width, screen_height);

        SDL_Event event;
        while(SDL_PollEvent(&event)){
            if(event.type == SDL_QUIT) {
                done = true;
            }
        }
        glClear(GL_DEPTH_BUFFER_BIT | GL_COLOR_BUFFER_BIT);
        SDL_GL_SwapWindow(window);
    }
    SDL_DestroyWindow(window);
    SDL_Quit();
    return 0;
}
We’re going to create a boolean done that will control our while loop, which will handle the updating of our window.
We will define a glViewport() which, similar to SDL_CreateWindow(), takes the x and y pixels of the top left of our window, and how big we want to window width and height.
With SDL_Event we are checking to see if any events have happened, such as the user quitting out of the application, or clicking the keyboard. After that, we want to call glClear(GL_DEPTH_BUFFER_BIT | GL_COLOR_BUFFER_BIT)
While this function call isn’t exactly necessary for us now, it is responsible for clearing the depth and color information in between every call in the while loop, essentially resetting the frame for us to write the next one. Finally, we are “swapping” the secondary buffer that was being generated in place of the current buffer that is being rendered.
Go ahead and compile your code, keep in mind you’ll have to also compile the GLAD file and include the SDL2 and GLAD frameworks. This is the terminal command I used when compiling (I use MacOS):
clang++ -std=c++20 main.cpp ./glad/src/glad.c -o spinning_shapes -I/Library/Frameworks/SDL2.framework/Headers -I./glad/include -F/Library/Frameworks -framework SDL2
Go ahead and run your program, I named mine spinning_shapes and ran it with the command ./spinning_shapes
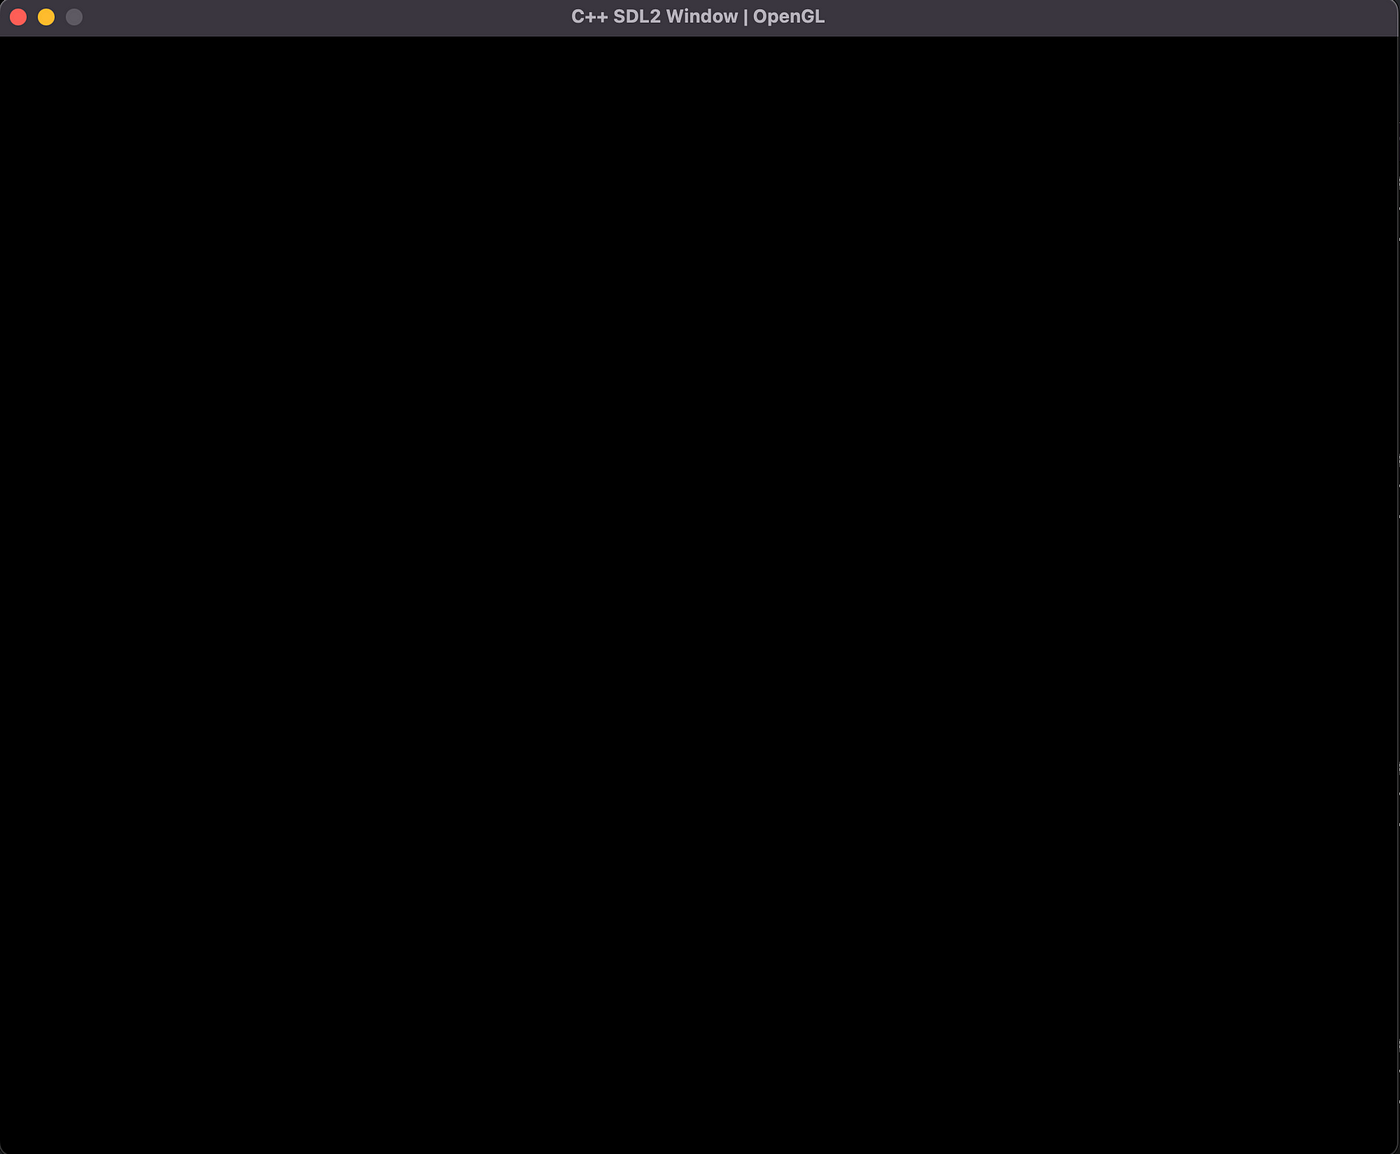
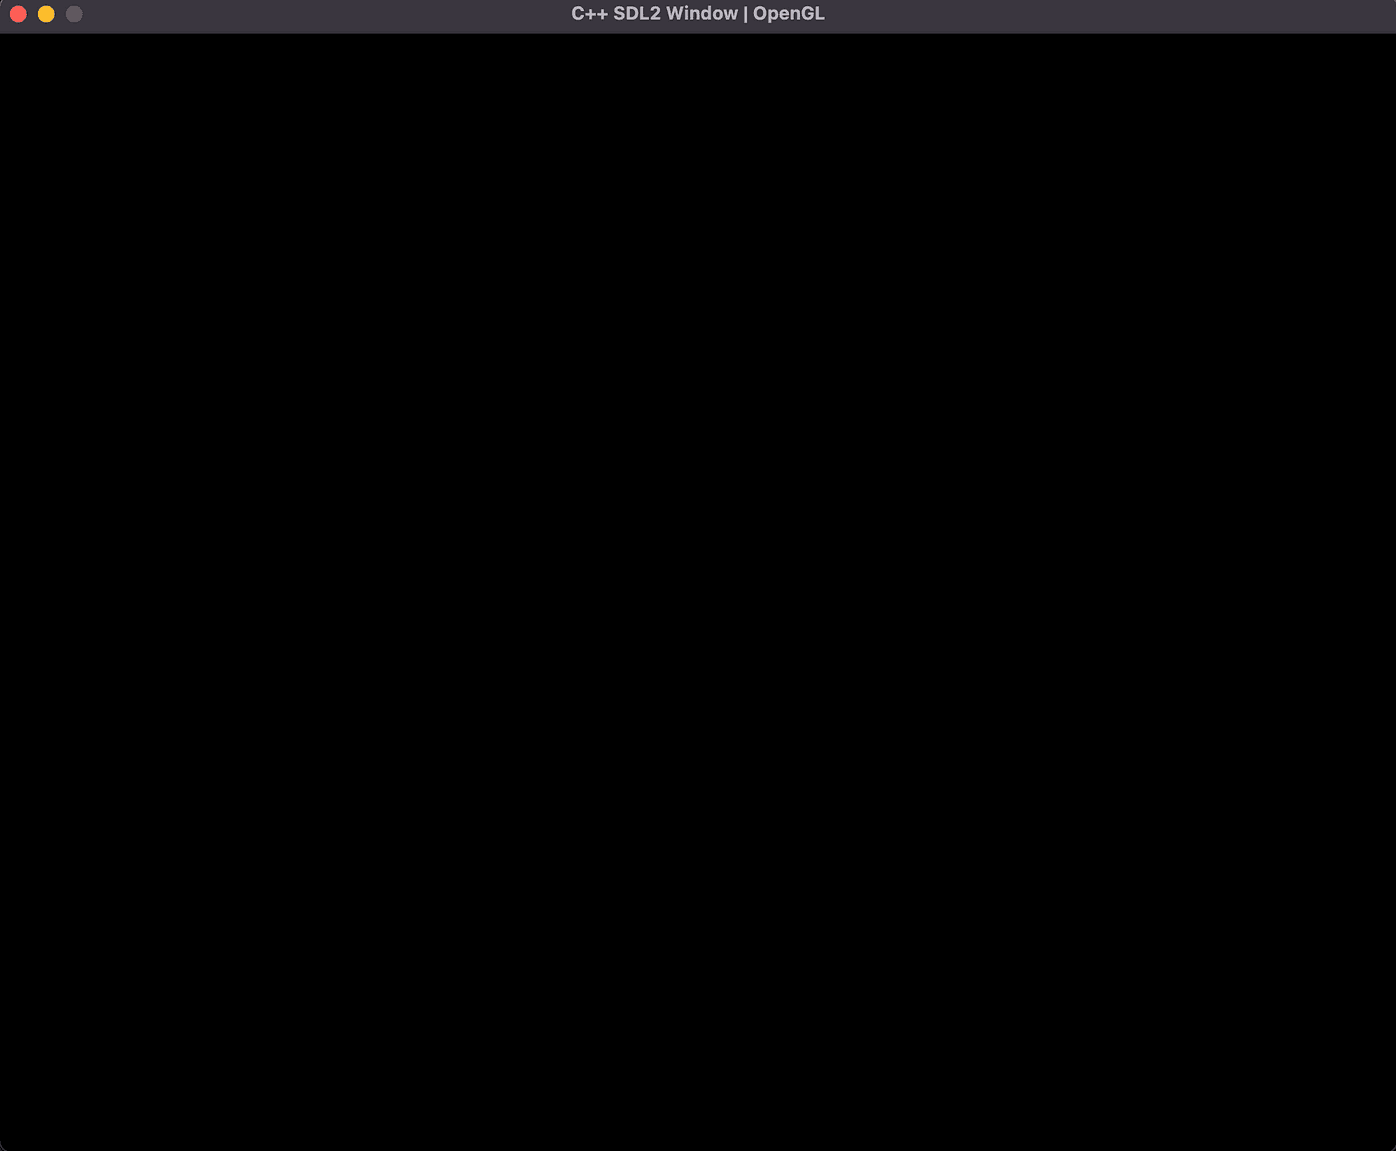
If you did everything right, an empty window is what you’ll see! How exciting.
In the next post, we will be integrating shaders into our program so that we are able to start drawing onto the screen, and we will create a square mesh to render.
Thanks for reading!